Use the widget builder below to create your free Before and After Slider widget for WordPress. Select a template and click “Continue with this template” to get started.
Do you want to add the Before After Slider to WordPress and others? No problem.
How to Add a Before/After Photo Slider to Your WordPress Website
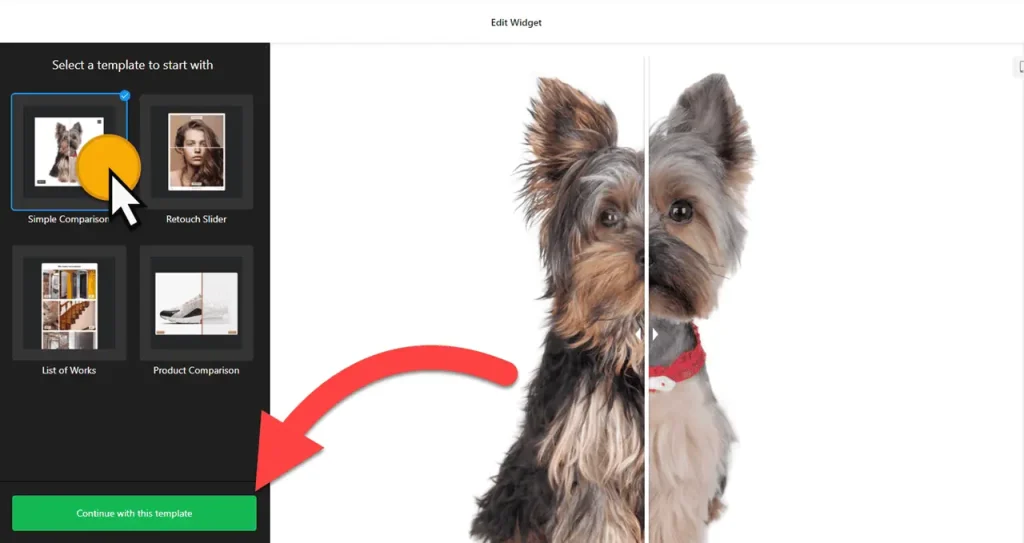
- Choose a template: All of the templates are responsive. Names of available templates are Simple comparison, Retouch Slider, List of Works, and Product comparison. Select a preferred template and click the “Continue with this template” button.
- Add comparison sets: Click on the “Add Set” button and update both images for the before and after. You can also add labels, captions, and multiple image sets.
- Layout settings: Choose a layout that best suits your content. The ‘List’ layout is great for displaying a series of comparisons in a linear fashion, while the ‘Carousel’ layout is perfect for a more dynamic presentation. You can also set the width in px or % to fit your WordPress website’s design.
- Settings: This section includes setting up the image ratio, slider’s direction, labels’ position, divider’s settings, interaction behavior, and full-screen mode.
- Customize appearance: You can customize the WordPress before and after slider widget’s look by changing the background, labels, captions, and controls. Custom CSS and JavaScript fields are also available for further styles and scripts.
- Get embed code: Once you have finished designing the before and after photo slider, click the “Add to website for free” button and sign up on the following page to save your widget. In there, you can copy the HTML code.
- Add Before/After slider to your website: Copy the image comparison widget’s embed code and use it on your website.
The Image Comparison Slider’s HTML Embed Code
Your Image Comparison Slider’s embed code includes An external JavaScript file and an HTML div tag with a class attribute unique to the widget you created. You can easily embed the before-and-after slider into your WordPress website by using the “Custom HTML” block in Block Editor. Here’s how:
- Visit your Dashboard and choose where to place the before-and-after slider on your WordPress site. This can be on your homepage, WooCommerce product pages, sidebar, or any post or static page.
- In your block editor, add a “Custom HTML” block as shown in step (1) of the image below:
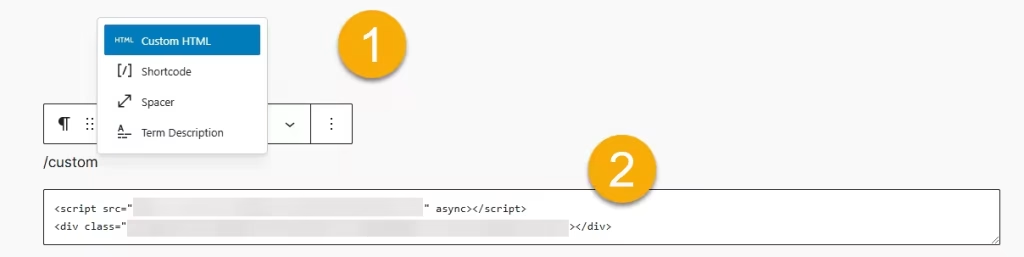
- Please enter the HTML code into the designated field and save your changes.
- Preview your website and view the before-and-after photo slider on your WordPress site.
Similarly, you can add before and after sliders to WordPress using page builders like Elementor, Beaver Builder, Divi, Brizy, etc.
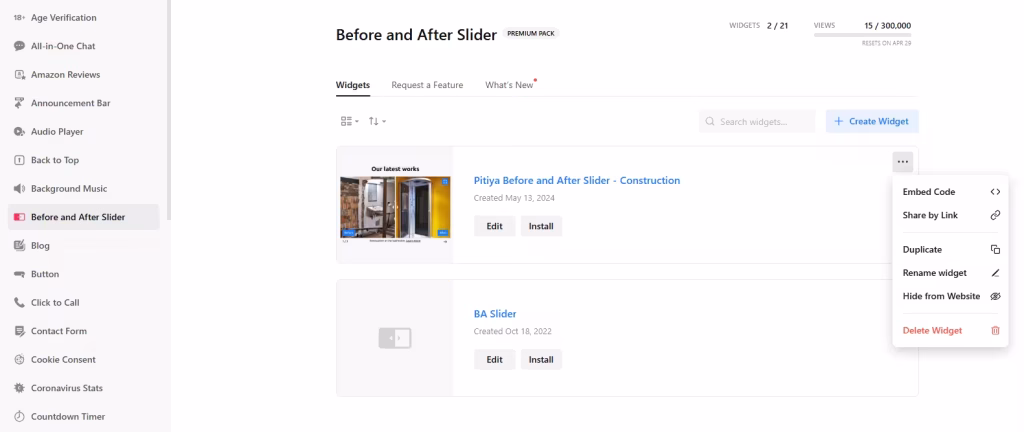
How to Manage Your Before and After Slider Widget
Once you have created your before and after widget for WordPress, you can easily manage it on your account. In your dashboard, search for the “Before And After Slider” app under the list of apps. As you can see from the following screenshot, you can create more Before/After Slider widgets, edit existing ones, and get HTML embed code.